Showing posts with label life as a crafter. Show all posts

Thursday, May 18, 2017

My Favorite Things Challenge


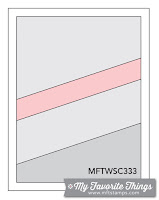
I completed another MFT Challenge. My sketch is flipped and it was not really for any other reason but because I cut it on the wrong side. I liked it and went with it.  That is the best thing about sketches. You can flip then and flop them. You can make them your own.  I know how much I enjoy having a good launching point and how great it can be to just relax and create sometimes.  I decided to use both the current challenges and make them into one.  Keeping it simple was nice too. I don't alway follow a sketch but I liked the lines in this one.  I hope you enjoy it too!  Give it a shot then post it! Oh and keep take a moment and print out the challenges keep them in a notebook for reference.  I know every one needs a mojo jump once and a while. 
Blessing 
Erika


Sketch from My Favorite Things 
Color Challenge - My Favorite Things

Sunday, September 18, 2016

CH CH CH Changes....

If you have not yet heard, I am no longer a full-time employee at Fun Stampers Journey.  It was a dream job, I was very happy working there and then life happened.  I don't want to share too much but I lost my ability to work full-time.  This means new beginnings for me.  I am still very much in love with the company and all the people that keep the wheels turning.  I helped to finish the next catalog that will be released on October 1st, then I resigned my full-time position.  Sadly, I do not own many FSJ products so a lot of what you are going to see here will be other manufacturers.

I did have my first week of not working full-time and it was busy but I am never too busy to create.  I had ordered some My Favorite Things Stamps a few weeks ago and they just so happened to come in so I made a few things.  I also have a few other good things in the works.  I plan to get a studio set up for some live cast, and to provide some tutorials for color theory as well as some other fun stuff.  I am still writing and will share tidbits of the children's story I am working on as they develop!  I thank you all for understanding while I was full-time that I had neglected my poor blog.  Hang with me friends and we will make beautiful things together! Please share with your friends and family I would love to see this blog grow!

Magical Dragons (Click for Link)


Your Rawr-some (Click for Link)

Llama Love (Click for Link)
Stepped Up Chevron - Click for Link -
This was free for spending $60 or more! WHAT

Tuesday, March 22, 2016

Fun Day

Well the move is pretty much over. We still have sorting to do in the garage, but I am tired of boxes and all the junk in them.  Downsizing is good and bad.  You know you spend years collecting stuff only to get rid of it!  I have decided that I need to use the stuff I have,the MFT (My Favorite Things) comes out with the new card kit and BOOM I am pulling out my card.  I AM SO GLAD I DID.  I love the Warm and Fuzzy kit.  It is AHHH DOOR AHH BULL (haha)  It was totally worth every penny and MAN is is packed with goodness!  So here is the card I made quickie last night with it.

I just want to tell you the product in this kit-- I have never owned one sheet of the MFT cardstock because you all know there are really only three brands of cardstock that I will purchase in order of loving, Stampin'Up! and Fun Stampers Journey (tied really) and Bazzill -- and now I can say Bazzill has been knocked to fourth place!  I love the MFT paper.  It was a nice texture and easy to work with.  I also got my first 6x6 paper pad of MFT also a thumbs up.  Buying the kit really did help me get exposed to many of their products I normally would not have purchased.  The ink was a nice hybrid too. I think I need to get some of the color ink pads before I render a judgement on them.

Of course when I ordered the kit there was a set with Cactus stamps AND dies (but they were sadly out of stock on the dies)  but I had to have the stamps. I mean I do live in Arizona.  Well-- they are so dang cute I almost didn't know what to do with them.  THEN I went on Pintrest and was browsing some color combos I had saved and BOOM this here card was born. I actually used the watercolors in the kit to make the "fuchsia" color of the back strip.  I dropped a little salt on the wet paint and it puckered up some and made a nice pattern.  Then I covered it with the Mint cardstock  but still you get the idea. OH both of these are colored with Copic Markers.

HERE IS A LINK TO My Favorite Things so you too can get started collecting the amazing products they sell.

Finally, I started this card several days ago, but since my move I share a space with my son (when he is home from college) for my crafts.  It was spring break so making stuff was limited to after 11 a.m.  -- Which is fine.  I would rather have him around then making stuff earlier than 11a.m.  OK back on the subject.  This card took a few days only due to access. I sketched it and it for the most part came out just the way I planned it.  I had fun playing with the Coral and Aquamarine. I usually shy away from those because they are SOOOOO southwest and I don't really like those colors.. but I am super happy with how the card came out.  All these products are Stampin'Up!

Please feel free to leave comments!  I love reading them.

Blessings
Erika

Thursday, March 10, 2016

I have not been MIA-- I have been MOVING!

 Rose Wonder Sympathy Card
 the image wraps around over the top of the card to the back.  
Yup! moving-- AGAIN!  We have found a little place that is perfect for us now that the last of our kiddos are moving on to college. This move is to a much smaller place.  I really had to downsize and at one point said, "I think I am gonna give it all up."  Then my husband reminded me, that there is no way I can be happy if I totally give up my crafting.  I agreed that my creating while not the world best is part of me.  I love it so, after much turmoil, I decided that I am enjoying my card making more than my scrapping (as I do a lot more Project Life style now). I am keeping a lot of the card making stuff -- stamps and what not, and NOT giving up my Stampin' Up demoship... (so if you wanna order be sure to pop over to my website Oh and we are in the final count down for Sale-A-Bration-- also an ideal time to join my team.)

I am still moving so please bare with me as I am trying to find all my stuff still, so I can only use what is found and put away.

All this to say I finally had a chance to create something for the first time in literally weeks last night.  Unfortunately is was for a friend who has lost her hubby.  It's not the best, but it was a get back in the saddle card.


  • I used the Rose Wonder Photopolymer bundle from the Occasions Catalog.  You can find it here.
  • Memento Ink. Works great with Copic Markers. You can find it here
  • My Big Shot. You can find it here.
  • OH and the new Big Shot Die Brush.  You can find it here
  • Copic Markers to color.  
  • Fine Tip Glue Pen to adhere the die cut of the small rose I put on the inside.  You can find it here.
  • I used Pacific Point Ink on the sentiment inside and out of the card. You can find it here


Here is what all those products look like.
Rose Wonder Photopolymer Bundle140804
Price$49.25
Big Shot113439
Price$110.00

Big Shot Die Brush140603
Price$11.00
Fine-Tip Glue Pen138309
Price$7.00

Pacific Point Classic Stampin' Pad126951
Price$6.50

Tuxedo Black Memento Ink Pad132708
Price$6.00

Monday, August 17, 2015

Paper PUMPKIN in the HOUUUUSE


 That is right friends!  Paper Pumpkin is in the HOUSE!! I love when I go to my mailbox, open it up and see that cute little red (orange - depending on who you ask)  box just sitting there waiting for a fun night of stampin!  It makes me almost giddy!  So this month Stampin' Up!  did a beautiful job with a fun trendy medium  CHALKBOARD!  it is everywhere and if you didn't know this already SU sells amazing Chalkboard paper.  It is even on SALE!  I love the texture it takes the Craft Whisper White ink just beautifully! I was super happy to find that you can get it in the clearance section right now.. only $3.19  THAT is a super great value!  Click HERE to see it on the site.  ALSO You can join Paper Pumpkin for 50% off your first 2 months.. that is just awesome!  I know once you get the first box you will be HOOKED!  Please be sure you designate me as your demonstrator (Erika Hayes Glendale, AZ 85308).

OK so enough of that... I wanted to share peeks of the newest addition to what I call P cubed (Paper Pumpkin Party).  You will see here a shot of the kit opened and the cute stamps but its not JUST cards this month friends!  Look closely and you can see great gift boxes -- yes they are included in the box! As ALWAYS everything is in the box! Your first month you even get an acrylic block!  That my friends means even if you don't want to become as crazy of a stamper as I am you can join Paper Pumpkin and every month get a little box of happiness complete and ready to go!  The other great thing for crazy stampers  you get a chance to try some of the product you may have wanted to try but not sure if you want to invest in the goodies. This month the Whisper White Craft Ink Pad is a good example.  It is not really that it is expensive, but you may have said "Oh I want to get THAT" but just forget to order it. (I do that all the time)  Paper Pumpkin gives you a sample of the best products and EXCLUSIVE stamp sets!  EVERY month so what do you really have to lose?  You get 2 months at 50% off.. so its like BOGO really!  Oh and no long term commitments.  If (which I doubt) you decide you want to take a break, just cancel.

--------------------------------------------------------
BACK TO THIS MONTH'S KIT:

I really hope you can see the stunning color palette  too!  Yes that is yummy gold foil!  It is perfectly combined with a blushing pink, white and of course chalkboard black!
 All the element are so beautiful this month.  I just love that I get to make some fun flowers and have a few great boxes for little gifts for --- wait for it... YES.. HOLIDAY gifts!  Its hard to believe but true!  The Season is sneaking ever so close.  I am also excited to share I have many workshops planned for the holiday season.  I hope you can join me for one or more. If you sign up for 3 you get $15 in SU products for FREE!  I am working with my TEAM to put together dates and times so be sure to check back soon!

NEED some EXTRA income with the holiday season sneaking so close?  Why not join my team and have support as you start a career in the glorious world of paper arts!  We are more than just a group of Stampin' Up! Demonstrators we are a family.  We are working as a team to improve our lives doing that thing we all have in common.... CREATING.  I do not ever leave a downline to do it all alone.  I am here for you to help you build a successful business.  I offer training EVERY WEEK!  So if you are interested in becoming a part of the MAKIN' PRETTY THINGS Team give me a shout.  I am here to make it as easy as possible.  Hobbyist or as a Career, we can make it happen for you!  Email me with questions: gzuswins@gmail.com

Blessing Friends
Erika

Friday, August 14, 2015

Coloring with LIGHT!

OK bare with me!  This post has many photos.  In the move, I have misplaced my SD card so I couldn't do a video!  In the photo it is difficult to tell, but the red is actually foil paper that releases with the holiday catalog.  YES this cute card was made with Christmas Cuties a new set for the holidays.

Let's talk about coloring.  It is fun , right?  Most the time yeah it is fun but it can be frustrating when you look at all those "professionals" work and think HOW do they do that?  Well today I hope to shed a little LIGHT (hahaha) on a easy way to ensure that you are using light to your advantage.  A quick story to explain how I came up with this technique.  I love me a good glass mat.  I have the WeR Memory Keepers glass mat and I use it for everything.  I use it to cut with my blades, to smear ink on for backgrounds or to act as a pallet for my watercoloring.  Glass mats are the best tool and one day while watercoloring an image for a card I looked at the mat and realized it has a tool that is remarkable!  Many cutting mats have this as well, but for this story it was the glass mat that gave me an epiphany. I want to begin there... my mat... this mat if you look closely has diagonal lines on it.  They kind of look like "rays" of the sun. I know it is hard to see with the light but they are there.  What I realized is these are great guides for coloring.  I can place the image I am working on on those lines and have a guide for the "highlights" (Figure 1)

That is where our technique begins.
Figure 1

Figure 2
Figure 3
The first thing I do is I decide what direction I would like the light to come from, in this case I wanted it coming from the upper right so I turned my mat to match that direction.  (Figure 2)Think of it like rays of light.  Then I decide how much light I want on my subject, do I want it to be hard light or soft, if I want it soft I place the image on the lines that are further apart.  As you can see in this image I secure my paper with a little washi tape. If I need to move the paper to get a better angle to color, I move the entire glass mat.  Securing the cardstock allows for my highlights to be consistent.  I will then add the image using the center line which will be my primary source of light (Figure 3 and Figure 4).  After I have stamped the image I begin to add highlights using a pale yellow.  Examine the image and ask yourself where would the light fall.  (Figure 5).  You can also get a strip of paper and follow the highlight line in the center of you image to check where the highlights should fall. (Figure 6).  Once you have your strip of paper, add small amounts of a pale yellow to the areas that would be raised and touch the yellow strip. (figure 7)

 In this set, there is not "chin" so I added a little one by using a slightly darker color.
Figure 4
Once you have the highlights you can proceed by adding some of the shadows. When coloring a face, it is a natural shadow just below the hair line, in the nape of the neck where the head would cast a shadow, under the nose and chin.   (Figure 8).
When it comes to hair, you want to know where the highlights are and then you naturally know how to color the hair. (Figures 9, 10 and 11)  You see that I have the pale yellow in place and I can see the places that would cast shadows better.  Thus adding a darker brown to the hair behind the neck, also on the folds of the hair.  This is also true with the clothing.  I added a bit too much yellow to a wing and the dress so I had to use greys to blend.  It works fine but I should have used a lighter yellow in those areas because the clothing and wings were to remain white.  On the sash (Figures 12, 13 and 14) you can see the effectiveness of adding a bit of yellow.  I made mine a little darker for demo purposes, but you can see how the yellow blends into the blue and literally highlights the places I designated.  Using the lines on my glass mat and my sun strip I was able to find the right spots to highlight.  It really is a matter of once you see the highlights you will naturally see the midtones and shadows.  The lines on the glass mat help me not lose my source of light.  I hope this tip helps you in your coloring.

Figure 5
 
Figure 6
Figure 7
Figure 8
Figure 9

Figure 10
Figure 11
Figure 12
Figure 13
Figure 14

Any questions?  No problem, just shoot me an email. gzuswins@gmail.com and I will try to get them answered as quick as a cricket!  Thanks for taking the time to read this long post.  I am going to try and get a card and turn this into a video.  I think seeing the hair colored in live action will truly help! 

Again you know I am a Full-Time Independant Stampin'Up! Demonstrator and the Makin'PrettyThings Team Leader. If you are interested in this kind of training and would love to be lucky like me and DO what you LOVE--- CREATE let me know and we will get you signed up for $99.  It doesn't get better than that... Start your own business for $99.  It was the best decision I ever made!  

Blessings Friends
Erika 

Thursday, August 13, 2015

Birthday Wishes C.O.W


Last night I put together the Watercolor Wishes Kit.  OHHH I love it. I made all those card in just a few hours and they are all unique and beautiful.  I enjoyed that the kit had everything I needed to complete each of these cards AND extra goodies to make more.  The kit has the block, the STAMPS, the inks, the embellishements, card bases, envelopes, step by step color instructions.  It is just FUN!

SO I was working with these last night and I fell in L.O.V.E. with the stamps set.  The script on the set.  I loved all the beautiful sentiments.  I am all for a Happy Birthday but I really like the Happiest Birthday Wishes it just made me smile.  SO I used the stamps from the Watercolor Wonder kit to create the C.O.W. (card of the week)  I ALSO wanted to share that I will be creating ONE monthly PDF with all the instructions for the Cards of the Week.  If you would like step-by-step directions please just let me know.  


I also wanted to add a quick tip.   As you can see I did not use the sentiment from the In this Together set (133869)  because I wanted to add the Happiest Birthday Wishes sentiment.  When a stamp set has the sentiment on the bottom like the "it's time to celebrate" image from In this Together it is a simple fix.  Simply cut a post-it to cover the sentiment (see below), ink the image, remove the post-it and stamp.
Notice I cut out the image after
stamping it on the post it.
I did this to ensure the least amount of
opportunity for ink to gather. 
I also used a round template to create the visual texture on the card by simply piercing the paper. I felt the card needed a drop shadow and created that by simply adding a very thin piece of Smoky Slate cardstock and lifting it on craft foam.  The image was colored using Copic Markers.

To make this card you would need:  
Copic Markers of your color choice. 
Craft Foam (I use adhesive backed foam)
In This Together Clear-Mount Stamp Set by Stampin' Up!
In This Together


I hope you enjoy this weeks C.O.W.  I am looking for a few contributors to the C.O.W.  portion if you are interested please send me an email at gzuswins@gmail.com   

Hope your challenge cards are coming along nicely.  I look forward to seeing them!  

Have a blessed day and tomorrow I have something I know you will enjoy!  A fun technique for casting light! 

Until then
Blessings Friends
Erika       

Monday, August 3, 2015

Chameleon Alcohol Color Tone Markers

Photo from the Chameleon Website 

I am excited to say I have added the Chameleon Markers to the family.  I want to give you a quick review of the markers and then allow you to ask questions or give your input.

Inside the package:

The set of 20 included 19 Color Tone Markers, a colorless blender, and a lining pen.  Yes, for all this I paid $80.00 I got them cheaper than the MSRP
When they arrived, they came in a lovely storage case.  I loved this.  It meant I did not have to spend upwards of $70 to buy something to hold my markers.
I did a little math  19 markers at  $7.99 (no tax) equals $151.81  and 2 detail liner pens at $4.99 (no tax)  equals $9.98 that is a total of $161.79 for that many markers  JUST counting each marker as ONE.  This gives you an idea on how they compare with the top-line markers.
Yes, you may find Copics at a better price somewhere else but I am just saying for the sake of retail cost.  The set of 20 markers at full MSRP from the Chameleon website is $99.00 
Then after looking closer, I realized tucked away in the set was a lovely gesture buy the company that makes these markers.  They had send a package of 10 replacement nibs. 

What I Love:

When I read the insert, I noticed something different. This company feels as I do!   ALCOHOL BASED markers are TOO expensive!  It is hard to take the plunge into the cost. 
I love the cost!  These markers are a great way for people to start with alcohol based markers, and have a rainbow of choices.  The replacement cost for items is MORE than reasonable as well.

I love the rich colors.  Even if you only used the base color and never mixed the toner once, the base colors are a beautiful compliment and compatible with any alcohol marker you already own.  So, if you peek up again at the cost, these markers are about $4.95 each.  That is a good price.  If you factor in the number of tones you can get… that would make them pennies not dollars. 

I love the blending.  It is flawless.  I love that I can put these in any of my student’s hands and they will have success.  I love this because it builds confidence. 

I love that the company seems to be willing to do whatever it takes to make the client happy and SUCCESSFUL with their product

I love that the nibs both a brush and bullet.  BOTH are very high quality

WHAT I don’t love:

I think NOT LOVE is a bit harsh, but the if there is anything about these markers that causes me to not be madly in LOVE with them it would be getting accustom to is the wait time.  The mixing chamber needs time to absorb the toner.  This is more of an inconvenience but I think for anyone with blending struggles the tradeoff is worth it!

I think that as this company grows and we see more people using them there will be more information on how to use the pens.  For now, the instructions available for techniques are limited. 
That is really it.  I really love these pens and I think if you are looking for a way to break into alcohol markers and want to have professional results and can learn to control your “timing” you will love them as well.


In summary, worth the money I spent.  I think the professional artist will see the value in these pens as well as the beginning artist.  They are a very reasonable price point without sacrificing the very high quality that professionals seek. 

Stay tuned for some fun techniques this week that will allow you to take your new Chameleon Markers for a spin! 

Blessings

Erika
Tuesday, July 28, 2015

Just a quick post


FIRST THINGS FIRST: 

When I moved, I knew we had found a resort-style living.  BIG spacious yard, pool, fruit trees I love that I look out from my creative spot and have such a nice green yard. *remember I live in Phoenix*   We love this house and then we met the neighbors!  Our neighbors have made us feel at home since before we moved in.  When we were just looking at the place they came to the fence and just welcomed us in.  We soon found out that they own...wait for it... yes own and operate.... ICE CREAM TRUCKS!! When we moved in (it was 115*)  he came over with a big box of ice cream to help us cool off!  Well ever since that time, whenever we are out he always offers us a Bomb Pop or whatever we want.  I wanted to do something to express my gratitude to our wonderful neighbors and I created this...
Sprinkles of Life (13997) and One Big Meaning (139420)
Simple Masking technique to make the double scoop
Colored with Copic Markers - More on them in August see below 


NEXT UP: 

I buckled down!  I got my planning done so there will actually be content posted every week!  INCLUDING Challenges and product review.  The first part of the month we will focus on reviewing markers, then later in the week I hope to have some tips/techniques on those products.  Eventually I would love to give some stuff away, so be sure to share and help me build the audience  to get the support!  

The schedule will begin the first Monday in August.  (August 3rd).

If everything goes as I plan the schedule will be 

MONDAYS - Product Reviews
TUESDAY - Stampin' Up! Spotlight, this will be the weekly special information
WEDNESDAY - CHALLENGE!
THURSDAY -  Project of the Week
FRIDAY - Alternating Weeks  Design Skills or Techniques *even weeks  Opportunity for my readers *Odd weeks

FINALLY:


Thank you all for your love and support!  I wish I could give each one of you the special treat you deserve.  Stay tuned and take part in the growth of Making Pretty Things and Thinking Through Design!  

Feel Free to leave me your thoughts!  

Blessings Friends
Erika

Saturday, July 25, 2015

Pretty Pumpkin in July and a few bonus cards

Good Evening my friends!

I wanted to show you a few completed cards from this month (JULY) Paper Pumpkin.
As the hint suggested, Stampin'Up!  has stayed true to form and kept current with the fun trends.  Succulents are all the rage right now and it seems like I am super lucky to live in a state where they grow naturally! I love the Paper Pumpkin this month it has a lovely color scheme and that paper ohhh that paper.. I could just hang it in a frame so I can look at it all day!  I love the attention to detail as well, Stampin' Up! proves once again that we can have fun trendy cards in just a short time that are perfect to send off as an encouragement or just to say hello! If you are not a Paper Pumpkin subscriber yet, be sure to click this LINK and sign up, also be sure to designate me as your demonstrator!  (Erika Hayes in Glendale AZ 85308)
JULY 2015 - Paper Pumpkin  
Suggested design One

JULY 2015 - Paper Pumpkin  Suggested Design Two 

JULY 2015 - Paper Pumpkin  
Step It up with a little more ink and a using
Pretty Thankful Stamp Set (138936) to add a little pop

I needed to make  a birthday card for a really amazing woman and I am really blessed to call her mom.  This was a fun card to make and the adding the star sequin was a fun sparkle.

Endless Wishes (140273) and  Large Polka Dot Embossing Folder (133739)  

After making the birthday card, I had another idea for a card so I made this one. Sometimes simple is the very best!  
Endless Birthday Wishes (140273) and Fabulous Four (134174 Clear mount 134171 Wood Mount)
I also made use of the tremendously wonderful  Banner Triple Punch (138292)  

I am excited to share these fun projects with you!  If you would like the instructions on how to create any or all of these cards just send me note or leave a request in the comments!  If you want to get a little shopping done check out my shop at HERE

Thank you all for being a part of my life!  I treasure you!

Blessings
Erika